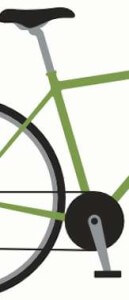
 1.) Saddle/Seatpost height – Ensure that the bicycle seat is set at the proper height for rider, allowing nearly full extension of the leg (knee is slightly bent) when the crankarm is at the bottom of the pedal stroke. The saddle should be level, padded, and be of a sufficient size (in width) for the intended rider. Learn how to select the perfect bicycle saddle for yourself. Check all connecting hardware on the seatpost/seat collar and underside of the saddle for signs of rust, corrosion, or excessive wear. Tighten all connecting hardware to prevent seatpost and saddle slippage while riding the bicycle. You can make a mark on the seatpost with paint, permanent marker, or tape once you have set it at the correct height for yourself. This mark will also help you quickly determine whether the seatpost has slipped further into the bicycle frame whilst riding. Learn more about perfecting your bicycle riding position or consider the benefits of booking a professional bike fitting session at your local bicycle shop. Learn more about Saddle Sores and how to prevent cycling discomfort caused by chafing.
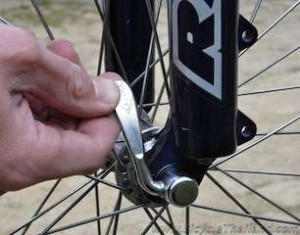
2.) Wheel bearings/Wheel straightness/Spokes/Tires/Tube valve – Pick up the front of the bicycle and spin the front wheel. Check that the wheel spins smooth and straight. Now place the wheel on the ground and grasp the top of the tire and attempt to rock it back and forth, checking for the small ‘click’clack’ sound & feel of loose hub bearings. Replacing old or severely worn wheel bearings is one of the best ways to improve the rolling speed of your bicycle. Ensure the quick release skewer is securely holding the wheel in place (image on right).
Now inspect the wheel spokes. Ensure that none are missing, bent, or broke. Inspect the sides and tread of the tire. Ensure that there are no deep cuts, scrapes, or abrasions on the tire that could cause them to fail at high pressure. Make sure that the tread of the tire is free from foreign objects (glass, metal, wood, thorns, etc.,) that may have embedded in the tire during your last ride. Now check the inner tube valve. Learn a little bit about the most common types of bicycle inner tube valves if you are not sure which kind your bicycle has. Check to make sure that the valve is straight, free of corrosion, and operating properly (does air go in & out?). Now, check the recommended pressure on the sidewall of the tire and inflate (using a bicycle air pump) it to the suggested PSI (Pounds per Square Inch). Learn more about proper Mountain Bike and Road Bike tire pressure to improve the control and smooth feel of your bicycle on the road and on the trail. Repeat all of the above steps for the rear wheel of the bicycle.

4.) Gears/Cables – If your bike has gears, you’ll need to ensure that they are functioning properly before setting off on your next ride. To do this, place your rear wheel up off of the ground and shift through all of the bicycle’s gear options while pedaling the bike with your free hand. Inspect the gear cables for cuts, breaks, or abrasions that would cause the gears to not function properly. Check the gear cables at every section where they come into contact with the bike; inspect for bent cables as well as signs of corrosion and rust at these points. The proper functioning of your gears is completely dependent upon relatively inexpensive cables – consider changing your bicycle’s cables frequently as a preventative maintenance measure.
5.) Brakes/Cables – If your bike has hand-lever actuated brakes, you’ll need to ensure that they are functioning properly before setting off on your next ride. To do this, squeeze the brake hand-levers repeatedly while rolling the bicycle slowly in the forward direction. Ensure the brake calipers engage each wheel smoothly and efficiently, stopping the bicycle without having to apply excessive force on the hand-levers. Inspect the brake cables for cuts, breaks, or abrasions that would cause the brakes to not function properly. Check the brake cables at every section where they come into contact with the bike; inspect for bent cables as well as signs of corrosion and rust at these points. Inspect the brake pads (brake shoes) on the brake calipers for wear and proper alignment. The brake pads (brake shoes) should contact the wheel rim surface evenly and firmly, never coming into contact with the sidewall of the tire. The proper functioning of your brakes is completely dependent upon relatively inexpensive cables – consider changing your bicycle’s cables frequently as a preventative maintenance measure. If your bicycle has hydraulic brakes, then consider a scheduled preventative maintenance plan that will keep them in good working order for many trail miles to come.

***If your bicycle fails to meet any of these checks, or if you notice anything not working properly while you are riding your bicycle, you should not hesitate to take your bike to a qualified service mechanic at a local bike shop to have the problem investigated further and corrected. A properly maintained bicycle will last longer and is more fun to ride***
7.) Helmet/Reflectors/Shoes/Gloves – Now that your bicycle has been checked, it is time to ensure that you as the rider are properly equipped and ready for the ride ahead. Wear a properly fitted safety helmet (on every ride!), don reflective clothing or attach light devices to your bicycle (especially important at night!), pedal your bicycle with closed-toe shoes, and increase your comfort level with a pair of cycling gloves for a bit of extra padding and palm protection if you do happen to fall off your bicycle. If your commute or ride exceeds a distance of 10-15 kilometers you may consider wearing padded cycling shorts. The extra comfort afforded by padded cycling shorts and other properly fitted cycling clothing can make every bicycle journey more enjoyable. Find out how to dress for bicycle rides in any weather.
Now, get out and ride!
The various bicycle parts mentioned in this article can be quickly and easily located on these Bicycle Nomenclature images.
Leave a Reply