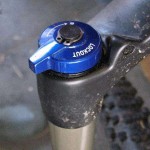
 Bicycle suspension systems serve two purposes: they reduce impact to the rider from bumps and uneven surfaces, resulting in less rider fatigue, and they maintain better contact between the bicycle’s wheels and the ground, resulting in greater traction and control. The basic structure of different front forks is very similar but the position of adjustment controls on suspension forks can vary depending on the manufacturer, make, and model. Refer to the manufacturer’s manual for your particular suspension fork to help locate pre-load, rebound, lockout, and compression setting controls. Your make and model of suspension fork may have all or some of these controls.
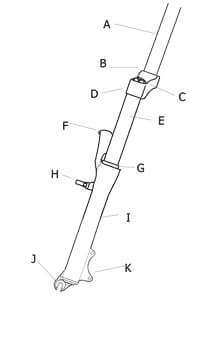
Anatomy of a suspension fork:
A. Steerer Tube
B. Crown Race Seat (enlarged area of the steerer tube where the headset crown race is pressed on)
C. Cap-top of the hollow stanchion (can be a dust cap, or a knob that adjusts compression or preload, or an air cap with a valve to add or relieve air pressure from an air spring)
D. Fork Crown (connects the two fork leg stanchions to the steerer tube)
E. Stanchion (stationary fork leg connected to the crown)
F. Brace or Brake Arch (spans the slider assembly from left to right and provides lateral stiffness)
G. Wiper or Seal (prevents dirt or other contaminants from entering the fork)
H. Brake stud (mounting point for linear pull brakes) *These are not present on ‘disc brake only’ suspension forks
I. Slider (lower fork assembly containing oil, air, spring, elastomers, etc.,)
J. Drop-out (mounting area for the front wheel)
K. Disc Brake Mount (mounting point for a disc brake caliper) Two styles: International Standard (shown) or Post mount
Basic Operation of a Suspension Fork
A suspension fork reduces the impacts and vibrations of uneven riding surfaces by compressing or extending along its range of travel. The travel of a suspension fork is the distance the fork slider moves on the stanchions from fully extended to fully compressed. The movement of the fork is controlled by the spring, compression damping, and rebound damping. Suspension forks use a metal spring (coil spring), pressurized air in a chamber (air spring), or an elastomer (a rubbery elastic polymer material) to return the fork to its normal position after activation. Compression damping controls how quickly the fork can move from its normal state to its compressed state. Many forks have adjustable compression damping; increase the compression damping and the fork will compress more slowly, reduce compression damping and the fork will compress faster. Rebound damping controls how quickly the fork can move from a compressed state to its normal state. Some forks have adjustable rebound damping: reduce the rebound damping and the fork will return quickly, increase the rebound damping and the fork will return more slowly.
Basic Suspension Fork Adjustment
The effectiveness of a suspension fork is highly dependent on how well it is tuned to the rider’s weight and the riding preferences. Each fork is slightly different in how it is tuned and what adjustments can be made. Here are some general guidelines that can be applied to most forks: Set the Spring Preload- the preload adjusts how much the fork is compressed when the rider is in a normal riding position. This amount of compression is known as sag. Sag allows the suspension to extend to keep the wheel in contact with the riding surface in the case of a hole or depression. See the owners manual of the fork for the suggested sag for a given fork, otherwise a good starting point for most forks is to be about 25% compressed when the rider is seated on the bicycle.
To set the pre-load on a fork:
- Turn the compression and rebound damping as low as possible
- Loosely attach a zip tie to one of the stanchions so it will barely stay in place on the stanchion
- Move the zip tie all the way down the stanchion so it rests against the wiper seal
- If your fork manual does not specify the range of motion for your fork follow these steps:
- Fully compress the fork by applying body weight, you should feel the fork bottom out
- If the fork does not bottom out reduce the pre-load and try again
- Measure the distance from the top of the wiper seal to the bottom of the zip tie
- Write this distance down so you do not forget it
- Find a wall to lean against or a strong friend to help support you and your bike, gently get on the bicycle and sit on the saddle with your hands on the handlebars just like when you are riding. Try not to compress the fork while getting on, just once you are seated.
- Dismount the bike and measure the distance from the top of the wiper seal to the bottom of the zip tie. This is the sag.
- Multiply the range of motion measurement from your manual or from step 4 by .25. This is the suggested sag.
- If the suggested sag is greater than the measured sag, decrease the spring pre-load. If the suggested sag is less than measured sag, increase the spring pre-load.
Adjust the Rebound Damping
Since the rebound damping controls how quickly the fork extends it must be adjusted so that the fork will be recovered in time for the next bump or hole. Many stock forks or entry level forks will not have a separate rebound damping setting. On adjustable forks a good initial test is to push down on the fork while standing still, and then release it quickly and check that the rebound rate just about keeps up with your hands when you release the pressure. Otherwise rebound damping is adjusted to suit the rider and the trail conditions. Rebound damping that is set too high will cause the fork to “pack” or “stack” where the fork has not recovered from the previous impact before the next one comes. Rebound damping set too low will cause the fork to jump back or jump up into the rider after a big impact.
Adjust the Compression Damping
Properly adjusted compression damping prevents the fork from bottoming out when compensating for a large impact. The best way to set the compression damping is by riding. Follow the instructions in the fork manufacturer’s manual for initial settings, otherwise start with the knob set about halfway between minimum and maximum. Ride a test loop with some moderate and large bumps. If it is set too low the fork will bottom out very easily. If the damping is set too high the fork will not compress very far even on large impacts and more shock will be transmitted to the rider.
Leave a Reply