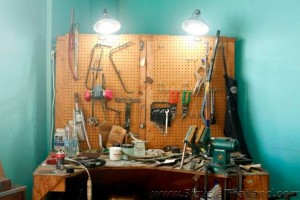
Over the past weekend I managed to piece together a fairly decent bicycle shop workbench for a very good friend of mine. I thought I would take the opportunity to share some of the advice that I’ve received and learned over the years about building such a workbench.
To start off, you’ll need to consider four things PRIOR to starting the construction of your bike shop workbench:
- Decide whether you want your workbench to be free-standing, and/or moveable, or permanent.
- Consider your current collection of tools as well as the tools that you intend to purchase in the near future.
- Think about what materials are readily available to build your workbench. This step will also take into account the appropriate budget that you intend to spend building your new workbench.
- Determine to incorporate off-the-shelf products or items that you already have laying around your house into the design of your new workbench.
1. Decide whether you want your workbench to be free-standing or permanent
A free-standing and/or moveable bench will require much more material to facilitate the bracing of the workbench against horizontal movement.

Additional leg braces and L-Brackets will be required to keep this style of workbench standing firm and solid against forces applied against it. This style of workbench is ideal for smaller operations that favor being able to periodically relocate the work surface or that are not able to attach the workbench permanently to any structure inside a house or business building.
A permanent bench will require slightly less material because it will make use of a structure (such as an adjacent wall) to stabilize itself from horizontal movement. Since the bench will be bolted, or otherwise secured, to a permanent structure, fewer leg braces and L-Brackets may be utilized with this style of workbench in order to obtain a firm and solid working surface. This style of workbench is preferred by larger operations that do not intend to relocate the work surface and are able to attach the workbench permanently to a building structure, ensuring a solid and ‘Nuke-Proof’ work station.
Now that you’ve decided whether you’d like your workbench to be free-standing or permanent, it is now time to take stock of your current and future tools that will be accommodated by the new workbench.
2. Consider your current collection of tools
Look at your tools – I mean REALLY look at them. Ask yourself a couple of simple questions about them:
- Which tools do I use the most often?
- These tools will need to be located in the center and lower portions of your workbench wallboard space.
- How can each of these tools be stored, hung, or displayed for quick recognition and access?
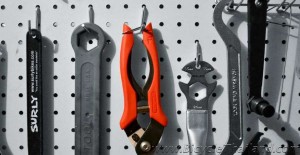
- Identify tools that have a hole, lanyard, or open space that enables them to be easily hung from a hook, nail, or screw. Separate those tools that do not have these features.
- Which tools are the heaviest, and which are the lightest?
- Heavier tools should be located lower and to the sides of a workbench wallboard space, while lighter tools can be stored higher up.
3. Think about what materials are readily available
Now that you’ve sorted out your tools, it is time to consider your budget and find the building materials that match that budget, and are readily available to you. This step is very important. Over the years, I can honestly say that I have yet to build my ‘dream bicycle shop workbench.’ I’ve pored over countless workbench accessory catalogs, and drooled while walking along aisles of organized shelving units only to come to the realization that, in the end, you have to use what is in your budget and what you can actually get your hands on. Believe me when I say, a little bit of planning and a whole lot of ingenuity can produce some really great results from very basic supplies. Your imagination is limitless, while your wallet is not.
The workbench surface is actually a solid core door which I bought used (600 Baht) and split in half, glued and screwed together. Dimensions are 61 cm (24″) X 191 cm (75″). There is a notch out of the back right-hand corner (to allow for building structure) that measures 12 cm X 26 cm. Notching or beveling of the workbench surface can be accomplished with this device.
The workbench legs are built from rubber tree wood. This type of wood is never really straight, but it is less expensive and more readily available in Thailand. Each 300 cm piece of rubber tree 2 X 4 cost 400 Baht. Here are the measurements for each leg set (a total of 3 legs were used for this bench because of its length – a shorter bench could be built with 2 legs):
Back leg = 100 cm (39 1/2″)
Front leg = 100 cm (39 1/2″)
Leg brace = 54 cm (21 1/4″)
The 3 legs of the workbench I built are spaced 67cm (26 1/2″) apart. This spacing is to prevent the workbench surface from bowing (drooping) in the middle section. This amount of spacing also allows for 2 roll-away shelf carts to fit perfectly between each set of legs.
The workbench wallboard was constructed from a thin piece of furniture facade board on top of rubber tree 1″ (2 cm) X 2″ (5 cm) strips. The wallboard fastening strips were placed approximately 15-16″ (38-41 cm) apart in order to accommodate the facade board. The furniture facade board was, in my opinion, expensive, but fairly cheap (300 Baht) when compared to pegboard (2,000+ Baht and VERY hard to find in Thailand). The workbench wallboard is 165 cm (65″) X 84 cm (33″). Since I didn’t have pegboard, using hooks to hang the tools would be impossible, so I devised a three-tier system of rubber tree 1″ (2 cm) X 2″ (5 cm) wood strips fastened to the wallboard with holes bored through them that could hold the various sized tools (Flat-tip and Phillips head screwdrivers, Allen wrenches, etc.,). I drove small headed nails or screws into the 1″ (2 cm) X 2″ (5 cm) strips in order to hang tools that had lanyards or holes in their handles (Cone wrenches, spoke wrenches, bottom bracket tools, etc.,).
4. Incorporate off-the-shelf products or items you already have into your workbench design
I plan to cover a small portion of the surface of the workbench with a thin exterior carpet. I will use a staple gun to secure the carpet to the wooden workbench surface. Having this small piece of carpet (I suggest at least a 40 cm X 40 cm piece) helps to control small parts (ball bearings, springs, washers, small screws, etc.,) during hub and gear shifter rebuilds.

Dropping small items onto a metal, wooden, or tiled surface tends to send them bouncing off into places unknown, but having just a bit of carpet on your workbench will keep that from happening.
The height of your workbench is a personal preference, although I do recommend building it high enough so as to prevent yourself from having to continuously bend over to work on projects. Your lower back will thank you if you build the workbench surface at a level well above your belly button.
Taking the height of your workbench surface into account, you should always plan to have some type of organized storage below the bench. Shelving works great, and can add stability to the workbench if it is fastened to the legs of the bench. Metal or plastic container boxes are useful, but try to avoid the type that have lids. Repeatedly having to take off and put on container lids eventually leads to those lids ending up in the trashcan anyways. Roll-away cart shelves can help to keep bicycle items well-organized and quickly at hand when you need them. Products like these can be purchased at department stores and home furnishing supply shops. Buy products like this, measure them, and then incorporate their use into the design of your workbench. If you search them out after you’ve completed construction of your workbench you’ll be sorely disappointed when you find that you should have allowed one more centimeter under the bench surface to accommodate them.
There are several ways to build a workbench, and I’m always happy when I discover something unique in the design of a bench nestled away in the back of a bicycle shop. This article is meant to inspire and inform. I don’t intend for you to build the exact same workbench as I did. I want you to be more informed about how to go about building a workbench that suits your specific needs, according to your budget, materials, and tools.
Here are some great starting points for constructing wooden workbenches:
http://www.dmroth.com/woodworking/workbench/workbench.html
http://www.hammerzone.com/archives/workshop/bench/below20.html
Read more about bicycle tool choices for the beginner to advanced mechanic:

Quite a nice article, loved it!
Hello,
It’s very inspiring the way that you are making the wooden moveable workbench. Your article has the details informative about the workbench and workbench wallboard. Thanks for such a nice informative article.
Thanks,
Ahmed
Hello,
Its really inspiring the way that you showed how to make a moveable wooden bench. You covered the details construction process for the workbench and wallboard. Thanks for such a nice informative article.
Thanks,
Ahmed