This article will discuss the proper procedure for installing and removing pedals. This procedure is useful for those interested in replacing an old set of pedals or removing a set of pedals to facilitate easier packaging/transport of a bicycle. Frequent removal of pedals for the purpose of cleaning/inspection is really unnecessary. Most pedal sets contain internal bearings that are not serviceable and those that can be cleaned and lubed rarely need to be removed from the crank arm in order to do so. A pedal set should always be installed with a sufficient amount of anti-seize material applied to the axle threads.
Required Tools and Supplies
- Pedal Wrench 15mm – 9/16”
- Grease (Polylube) / Anti-seize
Recommended Tools and Supplies
- Mechanic’s Gloves
- Bicycle Repair Stand
- Cotton Rag(s)
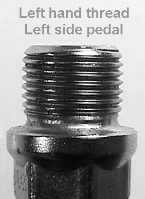
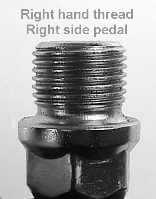
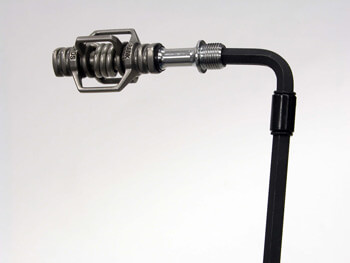
IMPORTANT NOTE: It is important to remember that pedal threads are different from left side and right side. The right side pedal has a right-hand thread (removes counterclockwise, installs clockwise). The left side pedal has a left-hand thread (removes clockwise, installs counterclockwise). Many pedals are stamped “L” and “R” for left and right. Additionally, the thread will appear to slope up toward its tightening direction. Left hand threads slope up to the left, while right hand threads slope up to the right, as seen in the photos below.
PROCEDURE – REMOVING PEDALS
Step 1 – Place bicycle in repair stand and shift chain to the largest chainring of the crankset. This will help to protect your hands against cuts from chainring teeth.
Step 2 – Rotate the crankset until right pedal is easy to access.
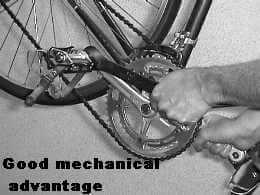
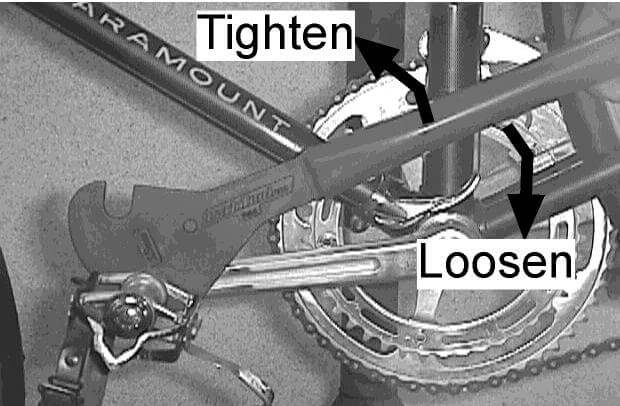
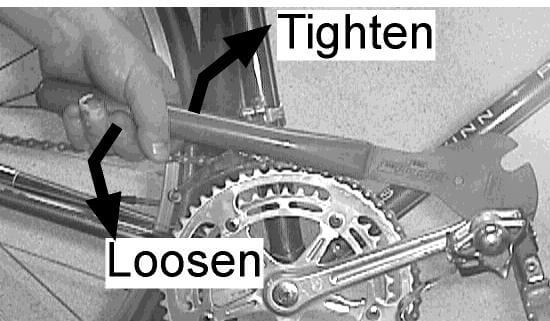
Step 3 – Fit your wrench onto the flat sides of the pedal axle. On some pedal models this is a very tight fit and the slim design of a real bicycle pedal wrench works better than a standard 15mm open-end wrench. Try different wrench positions until wrench and crank arm form an angle of 90 degrees or less, as seen in the photos below. This position will give you a noticeable advantage when applying pressure to the wrench handle.
Step 4 – Hold the opposite crank arm with your free hand for additional leverage. Turn pedal wrench counter-clockwise to remove right pedal. Take care not to scrape your hand along the chainring teeth or front derailleur. A good set of mechanic’s gloves could prevent injury.
Step 5 – Rotate the crankset until left pedal is easy to access.
Step 6 – Position pedal wrench for good mechanical advantage onto left pedal, and grab right crank with your free hand.
Step 7 – Turn pedal wrench clock-wise to remove left pedal.
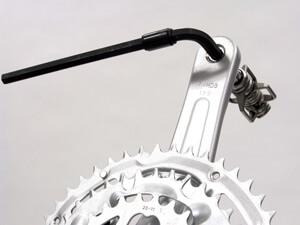
NOTE: Some pedal models do not have a flat portion of axle for use with a pedal wrench. These pedals will typically have a 8mm hex wrench fitting on the back of the pedal axle. Use a 8mm hex wrench in this fitting to remove and install the pedals. The pedal thread direction has not changed, but the appearance of the wrench turning “clockwise” or “counter-clockwise” will appear different. View the wrench from the orientation of the pedals, standing to the right side of the bike for the right pedal, and the left side of the bike for the left pedal. Turn the wrench accordingly.
PROCEDURE – INSTALLING PEDALS
Identify the right and left pedals. Look for “L” and “R” marks on the pedals or their axles. If no “L” and “R” marks are present, use the pedal thread direction to identify pedals. Left threaded pedals (threads sloping upward to the left) go to left crank. Right threaded pedals (threads sloping upward to the right) go to right crank. See photo in the Important Note section.
Step 1 – Heavily grease threads of both pedals.
Step 2 – Thread right side pedal into right crank using your hand. Use pedal wrench to snug pedal.
Step 3 – Repeat process for left pedal, but threading pedal counter-clockwise to install. Typical torque for pedal thread is about 360 inch-pounds. With a foot long wrench, that is about 30 pounds of effort.
NOTE: If pedal is difficult to thread into arm, or if the threads in the crank arm are damaged, there may be some repair possible by chasing them with a tap. Taps will align damaged threads, but will not restore metal that is simply removed. If no threads are left, have a professional mechanic install a pedal bushing kit.

It is not something you can do right now, but next time you change those cables think about fitting some cable oilers, middleburn sell some lovely little ones, it adds very little cost to a set of decent cables, means you can get away with using all of those little chunks of outer you have lying around, and makes continuous lubing of those cables a doddle
The steps to remove pedals from the bike: Loosen the spindle by rotating it until the pedal pops out of the crank arm. Repeat the same procedure on the other pedal on the opposite side. After removing the pedals, you have to check the new pedal set: You should use adequate lubrication of the pedal threads to ensure optimal mechanical performance of the new pedals. The next step in replacing a bike pedal involves inserting the correct pedal into the hole of the corresponding crank arm. Always insert the spindle at a 90-degree angle.
Knowing how to remove and install bike pedals is every rider’s responsibility. It ensures a safer and more comfortable biking experience by eliminating annoying noises and safeguarding optimal pedal function.
This is something I do; use adequate pedal lubrication.